

Chicken sticks are evenly cut strips of chicken breast cooked until crisp on the outside and juicy inside. They can be made on the stovetop, in the oven, or in the air fryer, with or without breading, using simple ingredients and controlled heat.
This recipe uses a quick brine, a balanced seasoning, and steady cooking temperatures to prevent dryness and uneven cooking. Total active time is about 20 minutes, with no complex steps or special equipment.
Once the method is clear, chicken sticks stop being unpredictable.
They become reliable.
I remember thinking they were foolproof. Thin chicken, hot pan, done.
Wait… that logic doesn’t hold up.
The sound of the oil, the smell of paprika warming, the moment the heat goes just a little too far—thin chicken doesn’t forgive shortcuts. That’s why this guide breaks down not just the steps, but the why behind them.
No myths.
No filler.
Just repeatable results.
Table Of Contents
Table of Contents

Chicken Sticks That Stay Juicy and Cook Evenly
Crispy chicken sticks made from evenly cut chicken breast, cooked with steady heat so they stay juicy inside and crisp outside. This recipe uses a quick brine, simple seasoning, and controlled cooking for reliable results every time.
- Total Time: 35 minutes
- Yield: 4 servings 1x
Ingredients
1½ lb boneless, skinless chicken breast, cut into sticks
4 cups cold water
2 tbsp kosher salt
½ tsp sugar (optional)
1½ tsp kosher salt
1 tsp smoked paprika
½ tsp garlic powder
½ tsp onion powder
¼ tsp black pepper
½ cup all-purpose flour
½ tsp salt
1 large egg
1 tbsp milk
¾ cup panko breadcrumbs
1 tbsp neutral oil
2–3 tbsp neutral oil, for cooking
Instructions
1. Combine water, salt, and sugar in a bowl and brine chicken sticks for 10 minutes.
2. Remove chicken from brine, rinse briefly, and pat completely dry.
3. Mix salt, paprika, garlic powder, onion powder, and black pepper, then season chicken evenly.
4. Prepare breading stations: flour with salt, egg mixed with milk, and panko mixed with oil.
5. Coat chicken sticks in flour, dip in egg, then press into breadcrumbs.
6. Heat oil in a skillet over medium heat to about 350°F.
7. Cook chicken sticks in batches for 2½–3 minutes per side until golden.
8. Remove from pan and rest for 5 minutes before serving.
Notes
Uniform sizing is key for even cooking.
Do not overcrowd the pan or the coating will soften.
For best texture, pull chicken at 160°F and let carryover heat finish cooking.
- Prep Time: 15 minutes
- Cook Time: 20 minutes
- Category: Main Dish
- Method: Pan-Frying
- Cuisine: American
Nutrition
- Serving Size: 1 serving
- Calories: 420
- Sugar: 1g
- Sodium: 780mg
- Fat: 22g
- Saturated Fat: 4g
- Unsaturated Fat: 16g
- Trans Fat: 0g
- Carbohydrates: 24g
- Fiber: 2g
- Protein: 34g
- Cholesterol: 110mg
Ingredients for Chicken Sticks (Measured for Control)

Before heat, before technique inputs matter.
For the Chicken
- 1½ pounds boneless, skinless chicken breast
- 4 cups cold water
- 2 tablespoons kosher salt
- ½ teaspoon sugar (optional, but improves browning)
Seasoning Blend
- 1½ teaspoons kosher salt
- 1 teaspoon smoked paprika
- ½ teaspoon garlic powder
- ½ teaspoon onion powder
- ¼ teaspoon freshly ground black pepper
For Breading (Optional but Recommended)
- ½ cup all-purpose flour
- ½ teaspoon salt
- 1 large egg
- 1 tablespoon milk
- ¾ cup panko breadcrumbs
- 1 tablespoon neutral oil
For Cooking
- 2–3 tablespoons neutral oil (canola or avocado)
Test note:
Measure everything once. Precision early prevents correction later.
What Chicken Strips Actually Are (And Why They’re Harder Than They Look)
crispy chicken strips live in a narrow margin.
They’re:
- Thinner than tenders
- Lean protein
- High surface area
That combination is unforgiving.
I used to cut them casually, trusting the pan to even things out.
Wait… that logic doesn’t survive physics.
Why They Dry Out Fast
- Thin cuts heat too quickly
- Protein fibers contract aggressively
- Moisture gets forced out
The sound gives it away.
A harsh, crackling sizzle means moisture is already leaving.
Choosing the Right Chicken for Chicken Sticks
Not all chicken behaves the same.
Actually… no… it behaves very differently.
Best Cut (Scientifically)
- Boneless, skinless chicken breast
Why?
- Uniform muscle fibers
- Predictable moisture loss
- Clean slicing geometry
Thighs stay juicier—but they curl, cook unevenly, and blur texture.
Exact Dimensions (Non-Negotiable)
- Length: 4–5 inches
- Width: ¾ inch
- Thickness: ½ inch
Cut against the grain.
Test note:
Uneven thickness = staggered doneness = dry compromises.
The Protein Science Behind Juicy Chicken Fingers
Let’s slow down.
Chicken muscle contains:
- Water
- Protein fibers
- Fat (very little)
When heated too fast:
- Proteins tighten
- Water escapes
- Texture becomes chalky
I once pulled sticks early, thinking time was the issue.
Wait… they were still dry.
The Truth
Dryness is about rate of heat, not just duration.
That’s why we intervene before cooking.
The 10-Minute Brine That Changes Everything
This step feels skippable.
It isn’t.
Quick Brine Formula
- 4 cups cold water
- 2 tablespoons kosher salt
- ½ teaspoon sugar
Submerge chicken sticks fully for 10 minutes.
You’ll notice the surface firm slightly.
That’s salt dissolving muscle proteins so they retain water.
Test note:
Rinse briefly and pat completely dry. Moisture on the surface kills browning.
Seasoning Chicken Sticks the Right Way
Seasoning isn’t decoration.
It’s penetration.
Actually… no… surface seasoning alone barely reaches the interior.
Balanced Seasoning Blend
- Salt → moisture retention
- Paprika → color + mild sweetness
- Garlic/onion → depth without burning
Massage gently.
You should smell warm spice, not raw meat.
Idiom check: Don’t overthink it. This isn’t the place to throw the kitchen sink.
To Bread or Not to Bread Crispy Chicken Strips
Both approaches work—but they solve different problems.
Unbreaded Homemade Chicken Strips
- Faster cooking
- Cleaner flavor
- Less margin for error
Breaded Homemade Chicken Strips
- Texture contrast
- Moisture buffer
- More forgiving heat window
I used to think breading was just crunch.
Wait… it’s also insulation.
The Correct Breading System (Why Each Layer Exists)
Skipping steps causes failure.
Layer 1: Flour
- Absorbs surface moisture
- Creates grip for egg
Layer 2: Egg Wash
- Protein glue
- Even adhesion
Layer 3: Panko + Oil
- Larger crumbs = airflow
- Oil promotes uniform browning
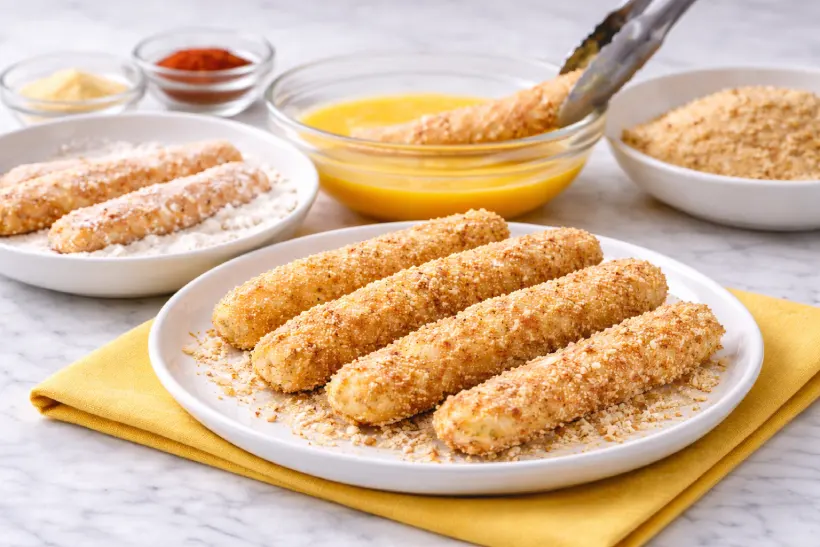
Test note:
Toss breadcrumbs with oil before coating. Dry crumbs brown unevenly.
Pan-Frying Chicken Fingers (Maximum Control Method)
This is my preferred method.
Heat Setup
- Heavy skillet
- 350°F oil
- Light shimmer, no smoke

Cooking Steps
- Lay sticks away from you
- Leave space between pieces
- Cook 2½–3 minutes per side
- Flip once—no fiddling
That flip should sound clean, not violent.
Test note:
If the crust darkens before internal temp rises, heat is too high.
Oven-Baked Chicken Sticks (For Large Batches)
Oven cooking is about airflow.
Setup
- 425°F oven
- Wire rack over sheet pan
- Light oil spray
Steps
- Arrange sticks evenly
- Bake 12–14 minutes
- Flip at 7 minutes
Smell shift matters.
Raw spice → toasted grain is the signal.
Actually… no… burning crumbs mean pull early.
Air Fryer Chicken Finger Strips (Fastest Option)
Air fryers magnify mistakes.
Settings
- 400°F
- 10–12 minutes
- Shake halfway
Use minimal oil.
Too much = steaming.
How to Know Chicken Sticks Are Done
Color lies.
Time lies.
Temperature tells the truth.
Target
- Pull at 160°F
- Rest to 165°F
You’ll hear faint crackling as juices redistribute.
That sound matters.
Resting: The Step Everyone Rushes
I used to cut immediately.
Big mistake.
Why Resting Works
- Fibers relax
- Moisture reabsorbs
- Texture stabilizes
Actually… no… it’s mandatory.
Dipping Sauces That Complement Chicken Strips
Sauce should echo flavor not dominate it.
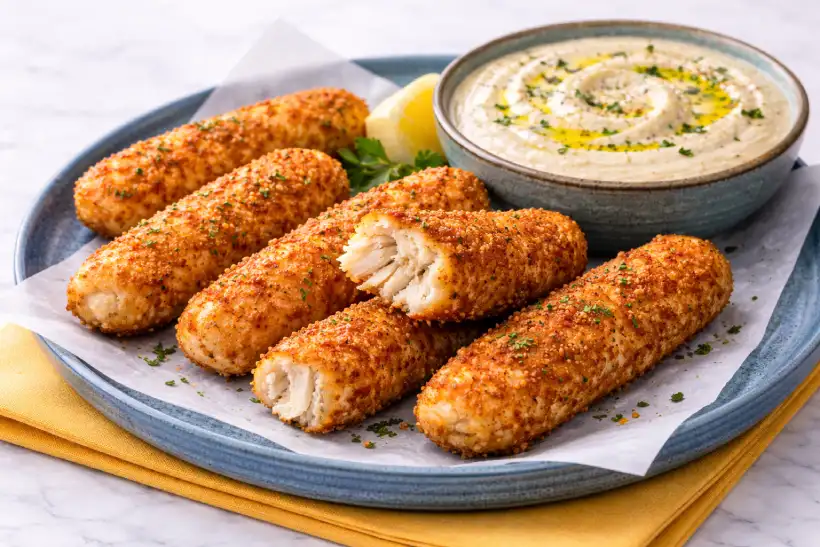
Best Sauce Pairings for Chicken Sticks
These sauces pair naturally with crispy chicken sticks and respect both texture and flavor.
- Creamy Pharaoh Sauce
Rich, smooth, and lightly herbed, it adds comfort while letting the crunch stay front and center. - Tonkatsu Sauce
Thick, savory, and umami-forward, this sauce clings perfectly to breaded chicken sticks. - BBQ Mayo Sauce
Creamy with a subtle smoky note, ideal for an indulgent but balanced dip.
Guiding principle:
Chicken sticks work best with sauces that are creamy or savory, not overpowering.
Serving Chicken Sticks Like a Professional
Presentation changes perception.
It always does.
Ideal Sides
- Roasted potatoes
- Crunchy slaw
- Simple green salad
Serve immediately.
Chicken sticks lose snap as they cool.
Storing and Reheating Chicken Strips
Storage
- Airtight container
- Up to 3 days
Reheating
- Oven 375°F
- 6–8 minutes
Microwaves destroy texture.
Actually… no… they annihilate it.
Common Chicken Stick Failures (And Fixes)
- Dry interior → Brine longer
- Bland taste → Season earlier
- Burnt crust → Lower heat
- Rubbery bite → Overcooked
Fix the process—not the ingredients.
If This Recipe Fails, Read This
If something feels off, don’t scrap the whole batch.
Most problems come from one small miss, not the recipe.
Chicken is dry
- The heat was too high, too fast
- Slow the cooking and lower the temperature
Inside tastes bland
- Seasoning was added too late
- Season the chicken before cooking
Breading fell off
- The chicken was still wet
- Pat dry and never skip the flour step
Outside burned, inside raw
- Oil temperature was too hot
- Let the pan cool slightly before continuing
Texture feels rubbery
- Chicken was overcooked
- Pull at 160°F and let it rest
Not crispy enough
- Pan was overcrowded
- Cook in smaller batches
Why this works:
Each fix targets one variable at a time. Change one thing, not everything.
Frequently Asked Questions
What’s the real difference between chicken sticks and chicken tenders?
Chicken sticks are cut manually from chicken breast.
Tenders come from a small, separate muscle and yes, they’re softer by nature.
With sticks, you control the size, the thickness, everything.
That control matters more than people think.
Why do chicken sticks dry out so easily?
Most of the time, it’s heat. Not time.
Too much heat too fast tightens the meat before it can relax.
I used to pull them early and still get dry results.
That’s when I realized speed was the enemy.
Is brining chicken strips actually worth the trouble?
Honestly? Yes. Especially for thin cuts.
Salt changes how the meat holds water—it’s chemistry, not tradition.
Even a short soak makes the chicken more forgiving.
Skipping it leaves you no safety net.
Why does the breading fall off while cooking?
Usually the chicken is still damp.
Sometimes it’s because the flour step was rushed—or skipped.
Flour isn’t there for flavor, it’s there for grip.
Without it, the coating never really sticks.
Can I make chicken sticks ahead of time?
You can, but expectations matter.
They won’t be quite as crisp as fresh, and that’s normal.
Reheat them in the oven or air fryer, never the microwave.
Texture lives or dies in that step.
How do I know when chicken sticks are actually done?
Color can fool you. So can timing.
A thermometer doesn’t guess—it tells the truth.
Pull them a little early and let them rest.
That pause does more than people realize.
What People Said About These Crispy Chicken Strips
Maria R. — Austin, TX
“Leo, I didn’t think chicken sticks could be this different. I’ve made them a hundred times before, but this version actually stayed juicy. I followed the brine step even though I almost skipped it. Worth it.”
Jason L. — Chicago, IL
“Quick note to say this worked exactly like you said. The heat control part made sense once I heard the sound in the pan. Mine used to burn outside and stay raw inside. Didn’t happen this time.”
Nina K. — San Diego, CA
“I usually mess up breading recipes, but the flour–egg–crumb explanation helped. Nothing fell off, which honestly never happens for me. Saved this one.”
Thomas B. — Raleigh, NC
“Made these for my kids and for once nobody complained about dry chicken. I liked that you explained the why instead of just listing steps. Felt like cooking with someone in the kitchen.”
Conclusion
Chicken sticks aren’t complicated but they’re honest.
They don’t forgive rushed heat, skipped steps, or guesswork.
Once you understand what’s actually happening in the pan, everything changes. The brine isn’t optional anymore. Resting stops feeling like wasted time. And cooking becomes quieter, more controlled, less stressful.
I used to think chicken sticks were just a quick meal.
Now I see them as a test of basics temperature, timing, restraint.
Get those right, and the result speaks for itself. Juicy inside, crisp outside, no drama.
Just solid food, done properly.